Friday, November 16, 2018

More Metals and Petals!


Hi everyone, welcome to my little blog today!

I am popping by to share my latest layout - created for the Scrap Matrix "Metals and Petals"challenge.

I had loads of fun with this layout - using some beautiful Stamperia Paper and colouring flowers with some Prima Paints.....

This is what I created:


This is how I created my background:

First, I mixed some Paper Artsy Fresco Finish Paints in Green Patina with some texture paste, and applied it to my layout using one of my favourite 13 Arts Stencils. 


Next, I mixed some more Paper Artsy Fresco Finish Paint, this time in Mudsplat, with some more texture paste, and applied it using my Carabelle Studio A4 Stencil called Calligraphic Composition.

Can I just say I loved the way the Paper Artsy Fresco Finish Paint mixed with my texture paste?  Wow - such solid colour!

Next, I broke out one of my new Paper Artsy stamps and stamped on some more yummy texture using a dark brown archival ink.


There we have the background!

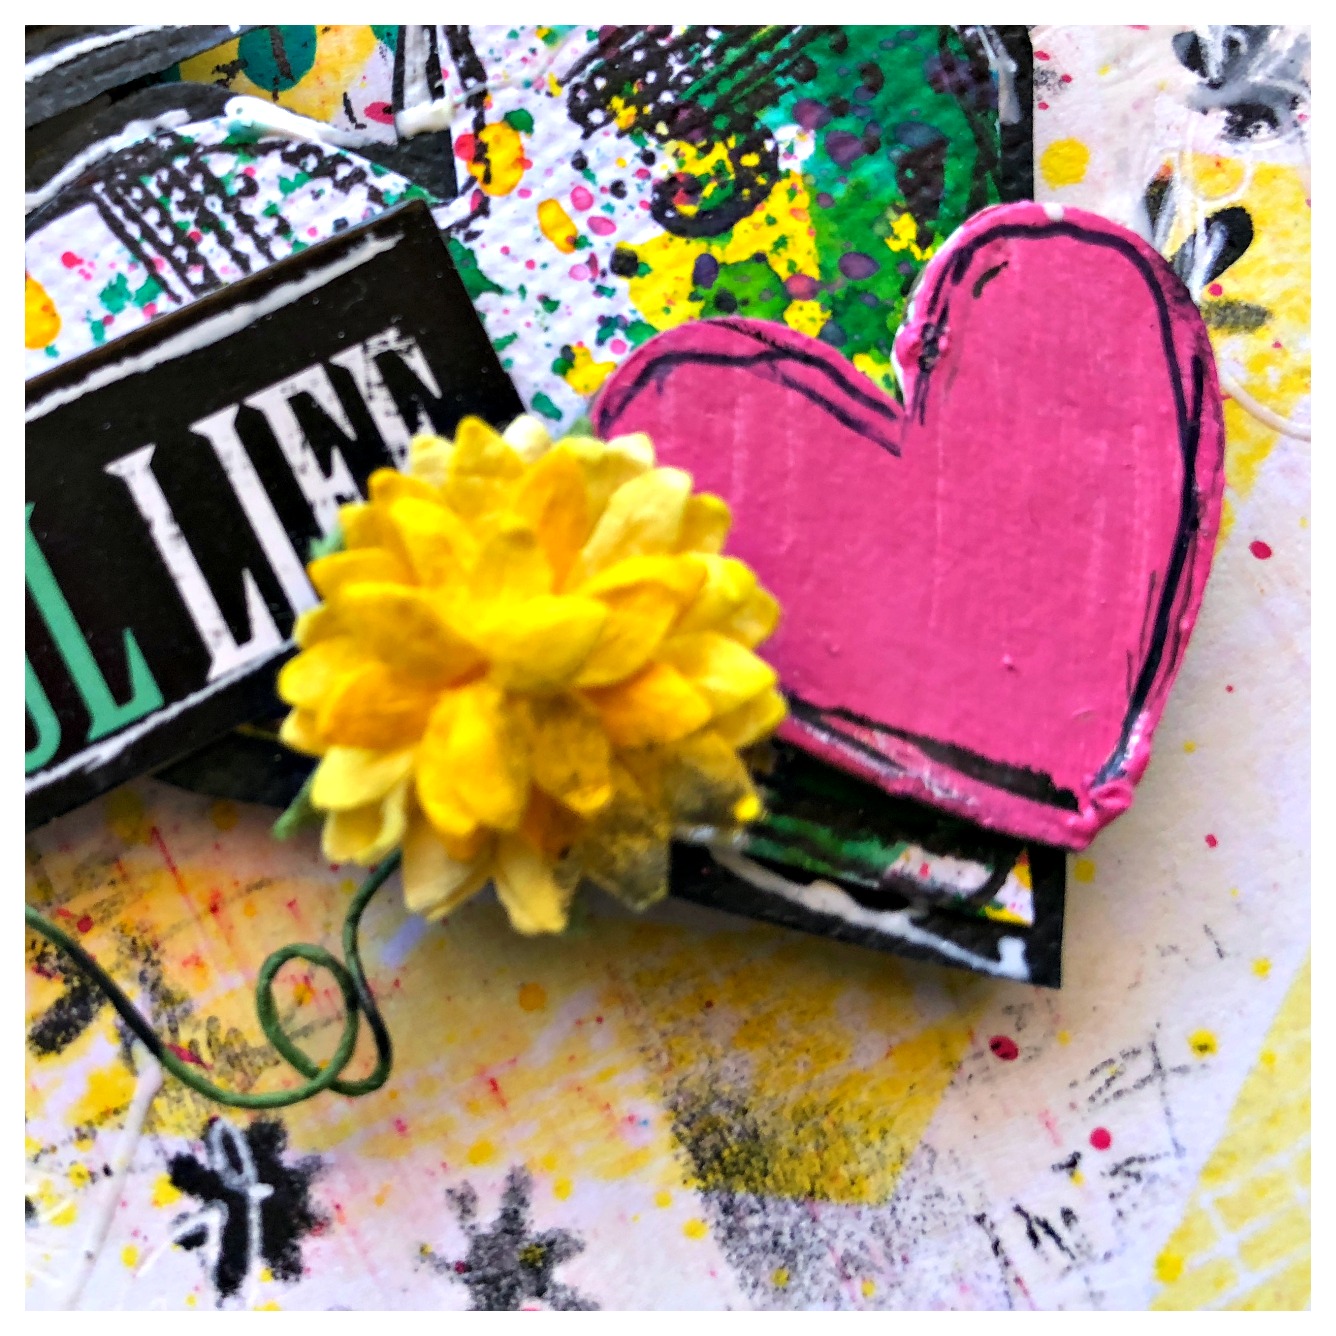
Next, I simply cut out some tags, and a photo mat from the gorgeous Stamperia "Clockworks" paper, and layered them under my photo.  I added some string to some tags for extra texture, and also cut out some clock images from another piece of paper in the range to add to the paper layers.  Stamperia paper is so good for this - it has such beautiful images and is so beautifully layered with images that you can have so much fun fussy cutting out divine embellishments.


I wanted to add a few flowers - no, I really don't have much of a problem adding flowers to my boy layouts, especially ones with a steampunk feel!  Anyway, I got out some Petaloo Mini Paintables  and my Prima Metallic Accents Watercolour set and painted them in a lovely teal colour to pick up the colours in my background.


I then started to put everything together.  I picked out some chipboard cogs from the Blue Fern Studios Cogs and Gears set, and painted them in Paper Artsy Fresco Finish Paint in Mudsplat and gathered together my metals - including some Prima Mechanicals Rustic Washers and Steam Punk Gears.  

When I was putting everything together, I was having trouble deciding where to place my flowers, so I took photos of what I was trying to make my mind up about, and compered them side by side.


I quickly decided I preferred the bottom photo.  The main reason for this is the pop of teal/mint forms a visual triangle around the photo, which then draws the eye to the photo - the main focus of my page.  In the top photo, the visual triangle draws the eye down into white space, and the eye is left floundering, wondering what to look at.  This is a very useful technique when you are deciding on your placement of embellishments.

Again, here is my layout once I was satisfied with the placement of all my embellishments:


Here is a full list of the products available in the Scrap Matrix Shop


Well that's all from me today, I hope I have given you some inspiration.  You still have plenty of time to enter the "Petals and Metals" challenge.  When you are finished, simply upload a picture of your creation to the "Petals and Metals" folder on our Scrap Matrix Shares page.  

Thank you so much for popping by today - and I hope you get up to something scrappy this weekend - I probably won't be hitting my scrap table until Sunday - but when I do I am going to make sure I have some fun!


Sunday, November 11, 2018

"Be Yourself" with Metals and Petals

Good evening Scrappy friends.  I am popping by the blog tonight to share the first layout I have created for this month's "Metals and Petals" challenge which is running with Scrap Matrix this month.

This is what I created:

 I decided to use this photo of my gorgeous niece, which I decided would be beautifully offset by the gorgeous 7 Dots Studio Garden Party collection.  The deep purple of the "Annual" paper suited the grungy effect I wanted to create.

I actually used two pieces of the Annual paper.  I tore off about one third of the first paper, and distressed the purple side, running some archival ink along the distressed edge.  I then adhered that to the second Annual paper.  Using the 7 Dots "Garden Party" 6x6 Floral Knot Stencil, I added some Black Modelling Paste to the background.


Next, I added some German Scrap Fleur de Lis #2 Black down the join where the two papers meet., and splashed on some white gesso.


To make my photo mat, I got some  tags from the 12x12 tag sheet, and some black paper for the photo mat from the 7 Dots Studio "Garden Party - Garden Gnomes" and stapled it all together.  Once done, I matted it to my photo with some cardboard to give it some dimension.


I added my photo just over the top of the Floral Knot Stencil, allowing some of the swirls to come out from underneath. I also tucked some muslin in under my photo for extra definition.


Finally, I added some embellishments - Cut our butterflies from the 7 Dots Studio "Garden Party - Born" paper, some Brass Round Medium #1 Flowers, some Brass Square Large #4 flowers and some stickers from the Garden Party 6x12 Word Stickers Sheet.  Voila!!  All done!!


Here is a close up:


Here is a list of products available in the Scrap Matrix Shop:

7 Dots Studio "Garden Party" Papers - Annual, Garden Gnomes and Born.

Thanks so much for popping by the Scrap Matrix blog today.  I hope I have inspired you to enter our "Metals and Petals" challenge this month. Go on - have a go, and once you have finished your creation all you have to do is upload it into the "Metals and Petals" folder on the Scrap Matrix Shares Facebook Page.  


Saturday, October 27, 2018

"You've Got Mail"


Happy weekend scrappy peeps!  Today I am popping in to share my second layout for this month's "You've Got Mail" challenge.
This time I went back to my old shabby chic/vintage style and used some of the gorgeous papers from this beautiful paper pad by Stamparia.  It has such gorgeous images of postcards, stamps and postmarks - how could I resist?


Here is my layout:

I just loved layering up all the papers to create depth and texture, as well as glimpses of all the "mail" ephemera.

Here are some close ups:


Here is a full list of all the products I used from the fabulous Scrap Matrix Shop:


Thank you for popping by my blog today, I hope I have inspired you to enter our fabulous challenge.  You still have a few more days - simply upload your entry into the "You've Got Mail" Album on the Scrap Matrix Shares Page.

Take care and Happy Scrapping!


Tuesday, July 24, 2018

She is Stunning

Good morning scrappy friends, I've just popped by to share a layout I created whilst on my recent school holidays.
 In case you don't know there are some absolutely gorgeous new Scrap Matrix products in the shop at the moment.  I went for a bit of a shopping spree recently and when I saw the absolutely divine 7 Dots Studio Garden Party Range I just couldn't wait to play with it.

This is what I created:

For this layout, I used the Fairy Lights and Dreamy papers, as well as the 12x12 Tag Sheet, the 6x12 Word Sticker sheet, and the Garden Party Stamp Set.

First I started on the background.  I used the  AALL #16 stencil and added some texture paste to the background.  Next, I added some purple ink and then rubbed some Finnabair Art Alchemy Metallique  Wax in Vintage Gold over the raised bits.  I also did some stamping with the Garden Party Stamp Set.


I then decided to add a bit more texture, and a few more images from that gorgeous stamp so I got a blank piece of tissue paper and stamped some more images onto it - like this:


Next, I carefully tore around the images and adhered to my page using matte medium.  I love adding stamped images this way, the tissue paper gives the stamped image a bit of texture and the matte medium dries clear so all your see is the image and the texture of the paper.

Once my background was finished I put some muslin down under where I wanted my Picture to go, and then backed my picture with a piece of Garden Party - Annual and some tags from the 12 x 12 Tag Sheet.  I added my photo to the background and then started embellishing with some fussy cut flowers from the Garden Party Dreamy paper, some stickers from the 6 x 12 word sticker sheet and some flowers from my stash.  I used a word from the 12 x 12 Arias Story Chipboard Words sheet, which I painted in purple ink and some gold paint.

Here are some close ups, you can see some of the stamped tissue paper images poking out from under my embellishments, so I hope you can see what I mean about that little bit of added texture.


Well, that's it from me today.  I hope you have been inspired to get yourself some of the gorgeous 7 Dots Garden Party range.

Here is a full list of the products I used from the Scrap Matrix shop:

7 Dots Garden Party Paper - Fairy Lights, Dreamy and Annual

Thank you for popping by xx.


Tuesday, July 10, 2018

Check Out This Sweet Challenge

The new challenge over at Scrap Matrix this month is a pretty sweet moodboard.  Check it out:


This is what I created with it:


I was so inspired by the delicious lolly colours of the pink, lemon and green in the moodboard, and decided to base my layout around that.  To match the whole "love" theme of the layout, what better photo to choose than one of myself and my wonderful man at our recent engagement party.

I used as my base paper this beautiful 13 Arts "Aria's Story" - Sweet Music paper.  The first thing I did was apply some Dylusions paint in "Polished Jade" using an AALL&Create stencil.  Next, I stamped some stitched lines over the paint using an AALL&Create Stamp similar to this stitched stamp.  I then drew roughly where I wanted my photo to go, then added some stencilling with AALL&Create Stencil #27, and some black archival ink, making sure I added the "rays" part centrally under the photo.  I then went in and added some stars with the same stencil and some black achival ink.

Once I was happy with my background, I added some layers across the green stencilling with some Dylusions Washi Tape and some German Scrap Renaissance Petite Black strips.  I then backed my photo in black cardstock and adhered it onto my layout.

I wanted to keep the bright happy vibe of my layout, so I added some embelishments using the same pinks, lemons and greens that had inspired me in the firsts place.  First, I spayed some Dylusion Ink in Polished Jade onto some packaging, and then splotched it onto some white yardstick.  I dried the ink, then splotched on some Dylusion Ink Bubblegum Pinkusing the same technique.  I dried the ink again, then added some Dylusion Ink in Lemon Squeeze onto the white carrdstock  in the same way.  Once all the ink was dry, I stamped some hearts onto the cardstock using the AALL&Create Stamp Set #12.  I then got some chipboard hearts from the Blue Fern Studios Eclectic Hearts pack and the "You Are My Love" title from the 13 Arts Arias Story Chipboard Sheet and painted them in Dylusions Paint in Bubblegum Pink.  I also got some chipboard embellishments from this Mambi chipboard embellishment pack.

Finally, I finished off my layout with some more stamping, some random scribbling of the word "love" using a White Irresistable Pico Embellisher some doodling with white and black pens and some Dylusions Ink Bubblegum Pink splatters.

Here are some close ups:


Thank you for popping by today and allowing me to show you my interpretation of this fabulous challenge.  Don't forget you have until the end of the month to get your layout done and uploaded into the folder on the Scrap Matrix Shares Page on Facebook.

Here is a list, with links of the products I've used that are available at Scrap Matrix:


Hope you get some time to do this fabulously delicious challenge - if you do, then to enter simply go to the Scrap Matrix Shares Page on Facebook and upload it into the the correct folder.

Happy scrapping folks!


Tuesday, May 22, 2018

The Point Is - Challenge at Scrap Matrix


Good morning scrappy friends, I am up on the blog this morning at Scrap Matrix,  sharing my layout for  this month's "The Point Is..." Challenge at Scrap Matrix.

This is a seriously cool, fun challenge - open to all sorts of interpretation.  Just to get the imagination ticking over, there is even a cool mood board for inspiration.


 As you can see, you can use triangles, chevrons, stars, arrows - anything at all so long as there is some "point" to it...lol.

This is what I created:
I am not sure if many of you know this, but my son was diagnosed with ASD (Asperger's Disorder) in 2011.  I really admire him  - every day he gets out of bed and heads off to school, usually without any complaint, knowing that things will be tough for him - he hates all the sensory overload of school, and because he is a little "different" in his mannerisms and his way of talking, he does get teased a lot.  As a Mum, it breaks my heart.  He usually doesn't let anything bother him though and he has a pretty good attitude and self esteem. Largely because we have always been very positive about him having ASD.  Because of ASD, he has so many good qualities - he is a great problem solver and can see patterns in so many things, he has a photographic memory, he is awesome at music, he is loyal, kind, empathic......He call it his "superpower," which I think is pretty cool.  So anyway, I really do think once school is over, he will come into his own.  I know he will find something he is passionate about and apply all that Aspie temerity and intelligence to being the best he can be.  That's what this page is about really.

So, here is a little about how I created my layout:

I decided to be a little different this time and go outside the box a little.  I used the Blue Fern Studio Ups and Downs Chipboard Panel  from Scrap Matrix to create the base of my layout.


I painted it with some Paper Artsy Fresco Finish Acrylic Chalk Paint in Terracotta with a tiny bit of Venice Blue added.  Once it was dry I used my finger to soften it with a tiny bit of Paper Artsy Fresco Finish Acrylic Chalk Paint in Glacier Ice from Seth Apter Boxed Paints (Set 4), then lightly sanded it back to add a little bit of texture.

I then fussy cut the geometric feature out of the Pink Fresh Paper - Escape the Ordinary/Explore and adhered slightly off centre of the chipboard panel.  To give it depth, I used some thick cardboard to lift it off the panel.

Next, I lightly sanded around my photo and adhered it to a piece of black cardstock.  Again, I used some thick cardboard to lift the photo up off the layout - all to give a sense of many layers. (I have to have layers - if I can't use texture paste, inks and stamps I have to do something...hehe.)

I picked some cool pointy embellishments from the Pink Fresh Escape the Ordinary Ephemera Pack and used them to create a visual triangle around my photo.

After I did that I decided it needed some more layers and some pops of black, so I used black cardstock to cover some of the chevron gaps in the chipboard panel, and then painted some of the leftover chevron pieces in black to adhere to the layout.

Finally, I used an Irresistible Pico Embellisher to trace around the black cardstock and the black chevron pieces, and some gold leaf to pick up the gold in the ephemera I used.

Here are some close ups:


Well that's it from me for now.  Don't forget if you want to participate in this Pointy challenge, complete your project by the 14 June and upload it to the "The Point Is.." folder on the Scrap Matrix Shares Facebook Page.

Thank you for popping by the blog.  All the links to the Scrap Matrix shop for the products I have used can be found below:


Saturday, May 19, 2018

Finally, a "Just Cos" Layout!


Happy Saturday Scrappy Friends,

I am finally back - with a layout I have done, just because I felt like it!!  It is so good to be able to do that sometimes.  I love my DT commitments, and I love my job, and my role as Mum and Wifey, but they do take a large chunk of my time, and I rarely get time to sit down and just let the creativity flow...

Anyway, here is my layout:


I have been lucky enough to come from a long line of people who love photography.  As such, I have collected many vintage photos from my Nanna.  Shortly before she passed away, I was visiting her and I took photos of many of her old photographs.  This was one of them.  The little girl in the front of the truck is my Nanna, and the rest of the people are her parents and brothers.  I think one of her brothers was taking the photo.  My great-grandfather owned a removalist business in Ipswich, and every now and then he would use one of the trucks to take the family camping.  Nanna told me they would all sleep in the back of the truck.

Anyway, to scrap this gorgeous photo, I chose to use the beautiful 13 Arts "Vintage Moments" paper, available here at Scrap Matrix.

I prepared my mixed media background by applying some texture paste with this Prima Stencil then when dry I added some of the gorgeous paint from the Paper Artsy Fresco Finish Acrylic Chalk Paint - Seth Apter Boxed Paints, (Set 4.)  I mainly used Spanish Mulberry, but also added in some Venice Blue and Steel Grey.  I then sprayed some Lindy's Stamp Gang Mist in Autumn Maple Crimson over the top.  I then decided (typical of me to chop and change) that it needed some lighter colours to break it up a bit, so I added some more texture paste with another stencil.

Next, I painted this Blue Fern Studio Framington Medley in the Spanish Mulberry Fresco Paint, and this Blue Fern Studio Family Title in cream paint.


I adhered the Framington Medley chipboard piece over the top of my background, so my photo would sit on top of it.  Then I backed my paper with some more of the 13 Arts Vintage Moments paper and adhered it where I wanted it to go.

To embellish my layout, I used some amazing pieces from a Tim Holtz Ideology Ephemera pack, some gorgeous flowers - Swan Roses in Burgandy and some pieces I diecut from some scrap paper, again from the Vintage Moments kit.  I also wanted some more vintage feel to my layout, so I added some of this gorgeous Vintage Lace 5 Camille Cream.

To finish it all off, I added my title piece to the top left corner of my layout, stamped some script randomly over my page using the Paint Chips Clear Stamp, and splattered some gesso over it all.

There you have it!!

Here are some close ups:


Hope you all enjoy the rest of your weekend, and that you can fit some time in to be creative.
Thank you for stopping by my blog.